Saturday, 9 February 2013

Flags & Banners


This page serves as a basic introduction to the flags or Fahnlein which the Landsknecht units carried into battle. I will touch upon the more well known flags as well as a few basic pieces of advice to give you the potential for literally hundreds of historically and geographically accurate flags. 

Imperial Standards


Clockwise from the upper left; Rennfahne, Reichssturmfahne, Cross of St Andrew simple and ragged.

The Rennfahne was the flag of the Arch Marshall of the Holy Roman Empire who held the responsibility of the protection of the Emperor and the representation of his interests on the field. It is occasionally referred as being the flag of Georg von Frundsberg; which it was in the respect that he was the supreme commander of the imperial forces under Charles V but this is not to be confused with his personal standard.

The Reichssturmfahne was the imperial battle flag and bears the double headed eagle, sometimes with the arms of the emperor in a shield on its chest as in the image below. When the emperor was not present the standard of the commanding officer became the battle flag.


The Cross of St. Andrew was a Burgundian motif adopted during the reign of Maximilian. It is shown appeared in either simple or ragged forms upon both plain and striped backgrounds (more on this later). Contemporary paintings (particularly that of the battle of Pavia) show variants of this with the heraldry and cross being gold and red upon a blue or yellow background.

Below is an example of an early ragged Burgundian cross, this was particularly prevalent in the armies of Maximilian and common up to around 1519;


Flag variants

Further to the flags above other Fahnlein bore the colours and / or the heraldic devices of the captain or city. The example below shows the variants one can achieve with this.


The banner on the top left row is the coat of arms of the Fugger family (a wealthy and influential family from Augsburg). The remaining banners are variants using the colours from their crest and in the example below right also indicating their imperial allegiance.

Many contemporary paintings and woodcuts show simplified banners such as these. Whether this is artistic license or accurate representation one cannot be sure but from a wargamer's perspective they are a neat way to represent a number of units being under one commander.


Here is a further example of the above principle using the city banner of Memmingen;

To the best of my knowledge the majority of Landsknechts recruited for the Swabian, Peasants & Italian wars were mustered in the Imperial circles of Austria, Wurttemberg and the upper and lower Rhine. The political map below illustrates these areas in a geographical context.


From the map above and reference to existing woodcuts depicting Landsknechts with City state banners (see below) I created banners to represent the major cities and electors of the Swabian League (there were many more lesser contributors);


Clockwise from the upper left; Cross of St. George, Baden, Dinkelsbuhl,Memmingen,Wurttemberg, Ulm, Augsburg, Fugger.


Clockwise from the upper left; Kempten, Ravensberg, Wimpfen
Saxony, Nuremberg, Bavaria


How I Make Flags


I prefer to hand paint flags so to start with I decide which flag I want to use and create it a black and white outline drawing using Adobe Photoshop as per the examples below. Do remember to mirror any heraldic devices;

Once I am happy with a design it is printed on to an adhesive backed A4 sheet of paper and fully painted in the same way as I paint figures.

I then cut out the flag using a scalpel and leave a trailing edge to make it easy to peel. The backing sheet is then peeled off and the trailing edge cut away. The flag is then carefully wrapped around the banner pole and neatly stuck to together, being careful to avoid any overlapping (a small amount occasionally does happen but you can paint over this).

You can put folds in by gently creasing the flag where you desire.

You can then add further tone and highlight colours in line with any folds you have created.

Gallery

Here we have some individual and group photographs from my collection which should give you an idea of the possibilities and colour combinations that work.


Basing Landsknecht Pike

 
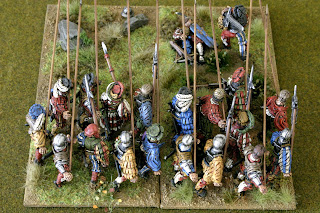
Basing Landsknechts is very much a matter for thought and composition as much as painting them is; the issues which struck me when dealing with them are how to get the best balance between being practical to game with and store along with visual impact and that overall feeling of your units looking realistic, the rear ranks being a tightly packed square and the attacking ranks a wall of steel with movement and menace.
 
I have thought long and hard about how best to approach the matter and finally settled upon using 120 x 60mm rectangular MDF bases from those lovely chaps at warbases.

This way each base is a compact composition with its own command vignette and a wide frontage to display your best efforts. I suggest you use between 14 - 16 figures with a pike to halberd / blade ratio of about 1/4 this will give you a representation of around 400 men in real terms.
 
Each base has two banners; in the examples below I have elected to use a city / ducal banner and an imperial banner on each stand which I think is quite a good formula. Below are units of Bavaria, Worms & Memmingen;


The other pleasing thing about using a 120mm frontage is that two of these together make a neat medium sized pike square;


The way I have positioned the flag bearers means that each square looks great when you look through the unit;


This style of basing really suits my preference to try and display as much as possible without obscuring figures whilst also still being practical .


These pike squares look great on their own but you can use the same basing principle with the front ranks of attacking pike. As with the standing units I have elected to base a double rank of Landsknechts with pikes at the ready on a 120 x 60mm base; this enables me to really pack them in tight to give a sense of the claustrophobic moment just prior to impact with pikes and halberds bristling.
 
The long base also contains most of the length of the pike which makes for ease of storage, imaginative basing and minimises upon wargaming entanglement with other units.


Two of these units together gives you the same frontage as the standing pike bases;


Here's the end effect, the banners of the Fahnlein are tightly ensconced within a protective wall of pike and you have a unit which is an impressive diorama.
 
 
The other idea behind this approach was that the attacking units have no flags (though some individuals have imperialist field signs) so they could interchange with other units of standing pike which could have Imperialist, French or Swiss flags


Friday, 8 February 2013

A Step by Step Guide, part 1; Tools & Materials


This page is the first in a series of guides which will lead you through each step in painting a group of Landsknecht miniatures.

Before we begin painting allow me to introduce my painting desk as it's a rather important piece of kit.

Whilst painting I like to have a number of images at my disposal as reference points, no more so than when painting Landsknechts as I find it helpful to have some visual cues as to how their clothing was made and also I find it helps me to select a palette.

This desk is an IKEA 'Vika' combination, the feature that really helps is the raised glass top with room to slide reference material underneath which is great as books remain flat and don't get splashed with paint or water, plus you can leave the material there when you're not working ( a bonus for cat owners such as I !)

I also mix paint on the glass which wipes off easily. There are a number of lid and leg combinations, it really is an excellent addition to the painting armoury.

Now lets have a look at what's on top of the desk.

Most importantly is a decent angle poised desk lamp with a daylight bulb, I also like to keep a spare bulb in stock. To the left of the desk is a window for more light, I find this gives less glare from the sun which can be problematic if you place your desk against a window.

Next to the lamp is a rack of Foundry paints, 78 in all, that's 26, 3 step palettes, along with 2 Games Workshop inks (black and brown). They are arranged from red through to purple then browns with flesh, canvas (white) grey, black and metallics at the front, you can read more about selecting a palette via the page label on the right.

Nestled within some jars are a selection of brushes; I use a mix of Foundry brushes for fine detail work and Pro-arte Prolene artists watercolour brushes, sizes 0-2 for general work along with a couple of larger acrylic brushes for basing and varnishing. There are also a few palette knives which come in handy when basing.

The big box next to that is filled with unpainted figures and spare parts, bits n bobs etc.

As well as books I have taken to keeping my most used tools under the desk lid for quick access, namely;

needle files
sculpting tools
pin vice & drill bits
green stuff
mixing palette
scalpel & spare blades
steel ruler
tweezers
kitchen paper
stout foil (they type you may find from the top of whisky bottles)
short and beak nosed pliers
cutting mat

Throughout the course of these tutorials most of these tools will be used at some point but if you're just starting out the items listed in bold should serve you well in addition to brushes and paint.